“Ctrl + .” Or “ALT + SHIFT+F10” is one of my favorite shortcut in Visual Studio. You can use the same shortcut for various situations as described in below.
1. Adding Namespaces Automatically / Resolve Namespaces.
2. Generate Method Stubs.
3. Implement Interface/ Abstract Class
4. Generate Automatic Class Files
5. Rename Member variables or Classes
Let’s start with one by one .
1. Adding Namespaces Automatically / Resolve Namespaces.
If you are adding a new class in your code, you may need to add the correspondence namespace. To do it, you may either manually type the Using Namespace, or you just right click on the class name and select Resolve > Namespace. But using “Ctrl+.” you can automatically add the namespace in your code.
Let’s consider you want to add DataTable in your code, so for that, you right click on that class and select resolve the namespace.
Fig: Use Right Click To Add Namespaces
But using “Ctrl+.” you can automatically add the using statement . See the below Image.
Fig : Add namespace using Shortcut key.
2. Generate Method Stubs
You can also generate the methods stubs using the same shortcut key. Like, If you want to create method which will add to number, you can write like AddTwoNumber() and press “Ctrl+.” and Enter to generate the Stub for your methods automatically
Fig : Create Method stubs using “Ctrl + .”
Fig : Generated Stub for the methods
The most interesting point it will generate the stubs based on the type of argument we are giving. As shown in below picture for first cases is made integer and for the second its generated string.
Fig: Generated stubs based on parameters
3. Implement Interface/ Abstract Class :
Like similar process that we have used for first two example, you can implement all the Interface or Abstract class using the same shortcut.
As you have a Class called student which Implement Interface IStudentInfo, instated of manually implement all the properties or methods of the interface you can generate the interface stubs automatically.
Fig: Implement Interface
Fig: Implemented stubs for the interface
4. Generate Automatic Class Files
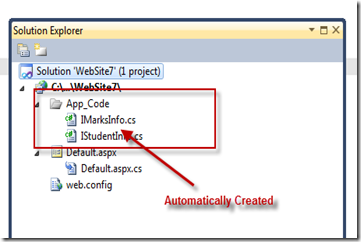
This is related to features 3. If you are trying to implement one Abstract Class or Interface which is not created, by using this shortcut key you can create the file automatically. You do not need any manual process to add the file. By using “Ctrl+.” and Enter a class file with the same name will be automatically added in App_Code Folder.
Fig: Generate new class/interface using shortcut key
Fig: Automatically Created Files in App_Code
5. Rename Member variables or Classes
By using the same key “Ctrl+.” you can also rename the same referenced variable at a time in all over the application.
Fig: Renaming all referenced variables at a time
Summary: In this blog post I have explained how you can use a single shortcut key “Ctrl+.” in different places of your development. Hope this will help you.
Cheers !


good post
LikeLike
I have a small question can we generate getter setter for member variable automatically in VS 2008?
LikeLiked by 1 person
Thanks very much for the great article!
I have used the shortcut for 2 years and recently I have lost information about it because I’ve changed Visual Studio.
Name of this shortcut is: View.ShowSmartTag
(I think the name for this shortcut is not obvious. So I had some difficulties to search it)
Regards
Bronek
LikeLike
its mine too 🙂
LikeLike
Excellent one. Very useful!
LikeLike
tanx
LikeLike
NOT WORKING IN MINE 2010 VERSION . SHOULD I NEEDTO INSTALL STYLECOP
LikeLike
It has nothing to do with Stylecop ! Check if the shortcut keyword is assigned to something else.
LikeLike
Hi Abhi,
Thanks for providing shortcuts. But, I am unable to automatically generate Interface or abstract class definitions using above shortcut..
Please let me know how to do it, as i have tried doing above steps.
LikeLike
Hi Shankar,
Maybe you should use these shortcuts to show Intellisense with names of code snippets and just choose expected one (ie. abstract class or interface).
Remember, first you should create snippet for interface and abstract class.
regards
Bronek
LikeLike
vry nice.. can u give example on properties using ctrl+.
LikeLike