In this blog post I am going to share how you can add a document header 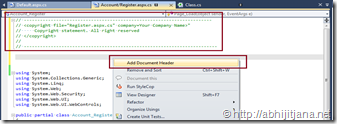 of xml comments with code file automatically. This is going to be an very interesting and helpful for all of you who are using styleCop to maintain coding standard. Actually extensive using of StyleCop helped me to think to make it automate. There are many tools available which can helps us in this case to do this automatically. But I always prefer let’s Visual studio do the job for me. Here I am going to share with you two different approaches to deal with this issue. Now it’s up to you which one to use.
Problem : StyleCop warning due to file header missing or mismatch for any “.cs” file.
Warning Message : “The file has no header,the header xml is invalid or the header is not located at the top of the file.”
Error No : SA1633
What I used to do?
I used to follow a dumb approach to save my bit of time. I save the template text in toolbox. And for each file, drag and drop the content from tool box and change the file name.
But do you think it was really a bad approach ? 🙂 Only problem was every time I need to update file name manually. Which makes me to think for automation. Once again, I am discussing all these approaches as I am not using any tool make it automate.
Two Different approaches to automatically add document header
Well, we have two different approaches to automate this stuff.
1. Using Templates
2. Using Macro
1. Using Templates :
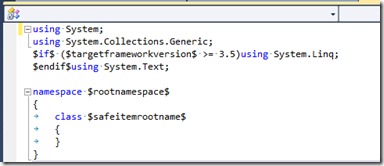
we can rewrite the Visual Studio code templates to customize the templates as per requirements. below is the default template for visual studio classes.
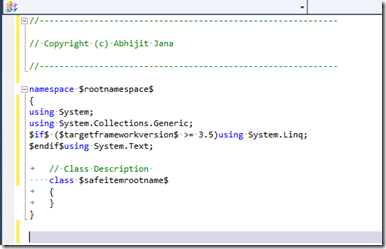
You can customize it as
Which will be generate all of your class as per the template once you update the new template with Visual Studio. Below, I am referring two good article from where you can see how you can customize the Visual Studio default templates, using which you can add document header automatically.
Visual Studio Templates – Add New Item to project
and
How to modify the default new class template for C# in Visual Studio 2008 or 2010?
Problem with the template Approach :
While we are using template, we need to modify the same thing for Class,Interface as well as Code file . And another thing, if you want to do it for already created files, template approach won’t help you. So I have decided to go with an macro approach.
2. Using Macro : Macro can do this job very well. If you are very new in this macro world, here is an good article which says How To Create and Run Macro in Visual Studio .NET .
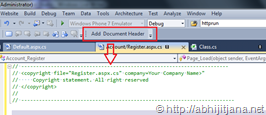
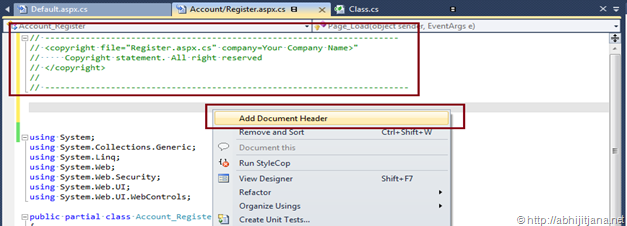
What I did here is, I created small macro which will add the file header automatically with proper file name. What you need to is to, just “Right Click > Add document header” or Just click on “Toolbar” button.
Below I am describing the bit details of implementation
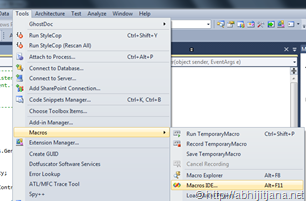
Step 1: Open the Macro IDE from Tools > Macros > Macros IDE
Click on Macros IDE. It will open the VS macros IDE.
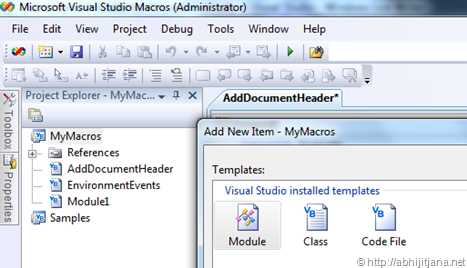
Inside macro window, Right Click on MyMacro and add New module as shown in below
Give the name as “AddDocumentHeader” ( It can be anything ). Copy Paste below code block as it is.
Imports System
Imports EnvDTE
Imports EnvDTE80
Imports EnvDTE90
Imports EnvDTE90a
Imports EnvDTE100
Imports System.Diagnostics

Public Module AddDocumentHeader
    Sub AddDocumentHeader()
        Dim document As Document
        Dim companyName As String = "My Company"
        Dim copyrightInformation As String = "Copyright statement. All right reserved"
        document = DTE.ActiveDocument
        Dim Matching As String = "// <copyright file=""" + document.Name + """ company=""" + companyName + """>"
        document.Selection.StartOfDocument()
        document.Selection.LineDown(True, 2)
        Dim content As String = document.Selection.Text
        'Check for already hedader exist or not. Here I am only checking with Copyright Text with in second line of code.
        Dim MatchFound = System.Text.RegularExpressions.Regex.IsMatch(content, Matching)
        If (Not MatchFound) Then
            document.Selection.StartOfDocument()
            document.Selection.LineUp()
            document.Selection.Text = "// ----------------------------------------------------------------------"
            document.Selection.NewLine()
            document.Selection.Text = "// <copyright file=""" + document.Name + """ company=""" + companyName + """>"
            document.Selection.NewLine()
            document.Selection.Text = "//     " + copyrightInformation
            document.Selection.NewLine()
            document.Selection.Text = "// </copyright>"
            document.Selection.NewLine()
            document.Selection.Text = "//"
            document.Selection.NewLine()
            document.Selection.Text = "// ------------------------------------------------------------------------"
            document.Selection.NewLine()
        End If
    End Sub
End Module
Build and Save the file. You are done.
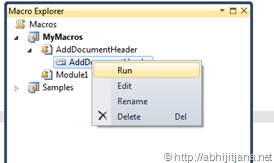
Now open your Any Visual Studio Project. Go to Tools > Macros > Macro Explorer. You will find, your created macro is there.
If you now click on Run, it will automatically add an document header with in the file with proper file name. 🙂 . which is well expected . Cool !!
Let’s make it more handy and useful by putting it in “Context Menu” and “Tool Bar”.
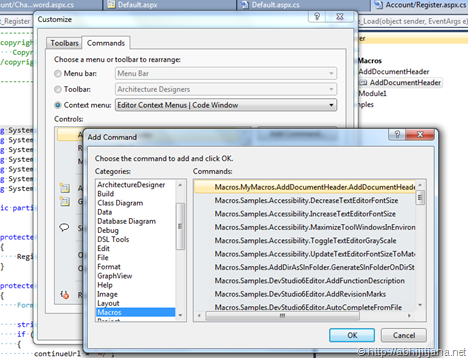
Too add this macro in context menu, Go to Tools > Customize. Moved to Commands Tab > Context Menu and then select “Editor Context Menu | Code Window” from drop down list.
Then Click on “Add New Command “. From where you have to move to ”Macros” categories where you will find your created macro listed in command window ( as shown in above image ). Click on OK.
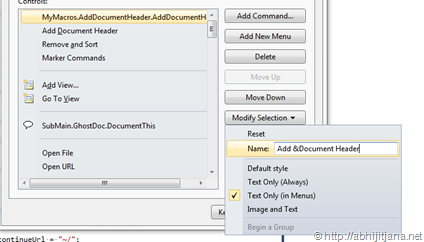
Now, you can change the name from “Modify Selection” section.
Click on “Close”. You are done. Now you have an context menu in you code editor to add the file header.
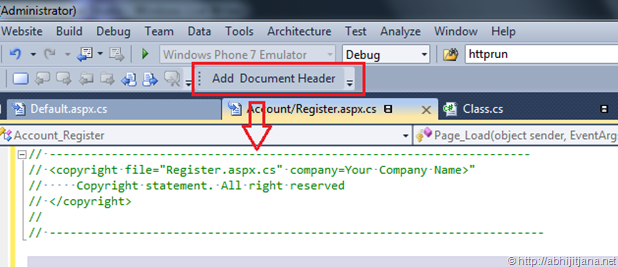
Similarly from customize > Toolbar section, you can add a toolbar button as well.
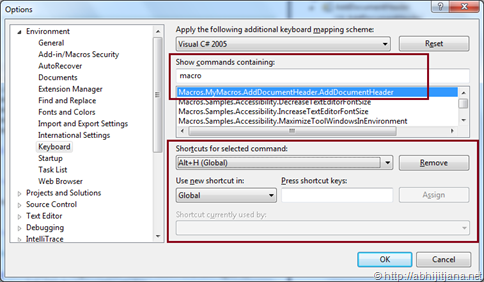
Now more funniest part is that, you can also add Keyboard shortcut for the same. From Tool > options > Keyboard . Type macro in search command window, you will get your document header macro available. Assign a keyword which you like to give ( I gave Alt + H ) ( make sure it’s available 🙂 ) . Click on ok.
Now what ? For any of your file, Press “Alt + H” , you will see your document header added automatically.
I was looking for some resource to do automatic update of file header during file rename , I found one intereseting article Macro Madness. This article may help you with some different problem as well.
Hope This will help you and save your some amount of time !
Thanks !



Hi Abhijit,
It’s nice one definitely, but I have two queries. If I run it multiple times, will it add the header for that much time or for a single time only? If I rename the file, will it update the section with proper name?
If those two things works fine, will be awesome. BTW, I know the modifying template file part but your post for running macro code was new for me. I learnt how to write a macro for VS today. Great job. Thanks for sharing.
Regards,
Kunal
LikeLike
Thanks K. Yes as of now, If you select “Add File Header” it will add multiple times, Which I have already noticed and working on that. I really thanks for your suggestion for rename file. Let me work on that .
Thanks again !
LikeLike
Hi Kunal,
I have updated the code with restrict multiple time addition features. It will check for copyright text in second line, if not it will add it again !!
Thanks for your suggestion !!
LikeLike
Good one. Now it’s looking very good and it will really help everyone.
Good job Abhijit to implement the same.
LikeLike
Thanks k. I think, need to work more to take care of it, during file rename. Thinking for creating a VS Addin with some more funcationality !!
LikeLike
Nice job Abhijit Jana. For me its 5/5 blog. Every developer need it and we used to spend lot of time to write file header. Now its more standard way to document your code. Can we use it for class documentation too?
LikeLike
Avtar, Thanks very much ! Yes, this will really help many of us.
Do you mean by commentng methods, regions, properties etc ? .
LikeLike
Well, its a nice addition. Yes VS Macro is very new to me as I didn’t used VS Macro before. Kunal’s suggestion is really what you might work on. The article is really something worth..
On a side note, Why did you use VB.NET to create the Macro? The vb construct does look odd to me bro. 🙂
Anyways, cool trick man. Keep it up.
LikeLike
Thanks Abhishek .
I will be working on to create a extension with some more additional features for the same. Till them, let’s macro do the job !!
LikeLike
Hi I stumbled upon your page by mistake when i searched AOL for this concern, I have to say your website is absolutely valuable I also enjoy the design, its beautiful!
LikeLike
Really cool one and very helpful.
Keep it up!!
LikeLike
Thanks Brij !!
LikeLike
good one
LikeLike
Rather than a macro, we use the Code Snippets feature of Visual Studio to handle this same task. It has the added benefit of providing a standard way to maintain different comment syntax for different .NET language (VB, C#, F#, etc) via the Code Snippets Manager under the Tools menu.
LikeLike
AMAZING! Thanks pal!
LikeLike
Thanks Abhijit jana for help .
LikeLike
Hi
Abihjit,
Today I learn how to create a Macro and run it , My I’m facing one problem . I can’t add short cut key for this Header Documentation . After successfully run macro when I go Tools -> Option -> select keyboard -> Type macro in search command window, I find my document header macro . But Short cuts for selected command is disabled , I can’t able to create a short cut ……like you did Alt + H
LikeLike
Make sure the icon you are assigning is not in used.
LikeLike
I check it but the Shortcut for Selected Command is disable so , how can I choose , for e.g. Alt+ Q
Another thing is that the macro is made up with VB.NET , can I use C# instead of that .
LikeLike
Nice Article.. Very helpful. But I need it in a bit different way. I want to add file header only on my public header files. and that too at the time of building the setup. Is there any for this?
LikeLike
Good Article.
was curious, is it possible to add the header automatically when file gets added to project? Any help?
LikeLike
Hi, if you wanted to add during file creation, you can try with Template Approach.
LikeLike
I think this is one of the most important information for me.
And i’m glad reading your article. But want to remark on some general things, The web site style is perfect, the articles is really nice : D. Good job, cheers
LikeLike
thanks for how to!!!
LikeLike