This is the Part III of my Kinect .NET SDK Development series post. In past two posts I have discussed about Installation of Kinect Devices along with setting up your development environment and Exploring NUI APIs with Camera. In this post I am going to cover some more fundamental stuff of Kinect Camera. Kinect .NET SDK provides some API to interact with motorized tilt ( Check out the device details section of first post for more information ) to enables the camera up (+27 Degree) or down (-27 degrees) . To adjust the motorized tilt you need to set the NUI Cameras ElevationAngle property to a value between –27 and +27.

let’s follow the below step to create an application to demonstrate it.
Step 1. Create a New WPF Project in Visual Studio 2010 named it as “AdjustingKinectCameraDemo”
Step 2. Add “Microsoft.Research.Kinect.dll” as Reference Assembly.
Step 3. Open the code view of your application and add “Microsoft.Research.Kinect.Nui” as Namespaces.
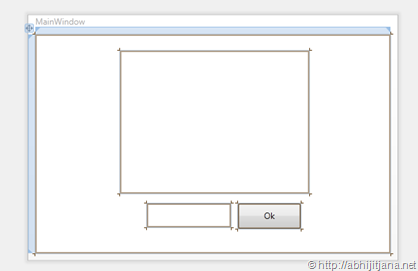
Step 4. The next thing we are going to do is, designing a small UI with one Image Control, TextBox and a Button control.
You can use below XAML Markup for the above design
 <Grid>
        <Image Height="203" HorizontalAlignment="Left" Margin="120,23,0,0"
               Name="imageControl" Stretch="Fill" VerticalAlignment="Top" Width="268" />
        <TextBox Height="34" HorizontalAlignment="Left"
                 Margin="158,240,0,0" Name="textAngel"
                 VerticalAlignment="Top" Width="119" />
        <Button Content="Ok" Height="36" HorizontalAlignment="Left"
                Margin="287,240,0,0" Name="buttonAngel"
                VerticalAlignment="Top" Width="89" Click="buttonAngle_Click" />
    </Grid>
Step 5. The next step is to initialize the Kinect Runtime and display the video into image control. We did this exercise in our last post. So, here I am not explaining how to do that, Just use below code snippet for the same.
       /// <summary>
        /// Define the Kinect Sensor Runtime
        /// </summary>
        Runtime kinectRuntime = new Runtime();

        /// <summary>
        /// Initializes a new instance of the <see cref="MainWindow"/> class.
        /// </summary>
        public MainWindow()
        {
            InitializeComponent();
            Loaded += new RoutedEventHandler(MainWindow_Loaded);
            Unloaded += new RoutedEventHandler(MainWindow_Unloaded);
        }

        /// <summary>
        /// Handles the Unloaded event of the MainWindow control.
        /// </summary>
        /// <param name="sender">The source of the event.</param>
        /// <param name="e">The <see cref="System.Windows.RoutedEventArgs"/> instance containing the event data.</param>
        void MainWindow_Unloaded(object sender, RoutedEventArgs e)
        {
            // Uninitialize the Device when Unload
            this.kinectRuntime.Uninitialize();
        }

        /// <summary>
        /// Handles the Loaded event of the MainWindow control.
        /// </summary>
        /// <param name="sender">The source of the event.</param>
        /// <param name="e">The <see cref="System.Windows.RoutedEventArgs"/> instance containing the event data.</param>
        void MainWindow_Loaded(object sender, RoutedEventArgs e)
        {
            // Initialize the Device when Load
            this.kinectRuntime.Initialize(RuntimeOptions.UseColor);
            this.kinectRuntime.VideoFrameReady += new EventHandler<ImageFrameReadyEventArgs>(kinectRuntime_VideoFrameReady);
            this.kinectRuntime.VideoStream.Open(ImageStreamType.Video, 2, ImageResolution.Resolution640x480, ImageType.Color);
        }

        /// <summary>
        /// Handles the VideoFrameReady event of the kinectRuntime control.
        /// </summary>
        /// <param name="sender">The source of the event.</param>
        /// <param name="e">The <see cref="Microsoft.Research.Kinect.Nui.ImageFrameReadyEventArgs"/> instance containing the event data.</param>
        void kinectRuntime_VideoFrameReady(object sender, ImageFrameReadyEventArgs e)
        {
            PlanarImage planarImage = e.ImageFrame.Image;
            imageControl.Source = BitmapSource.Create(planarImage.Width, planarImage.Height, 96, 96, PixelFormats.Bgr32, null, planarImage.Bits, planarImage.Width * planarImage.BytesPerPixel);
        }
Step 6 : Change the camera angle on button click as show in below code snippet.
  /// <summary>
        /// Handles the Click event of the buttonAngle control.
        /// </summary>
        /// <param name="sender">The source of the event.</param>
        /// <param name="e">The <see cref="System.Windows.RoutedEventArgs"/> instance containing the event data.</param>
        private void buttonAngle_Click(object sender, RoutedEventArgs e)
        {
            try
            {
                // Set the ElevationAngle of current runtime camera
                this.kinectRuntime.NuiCamera.ElevationAngle = Convert.ToInt32(this.textAngel.Text);
            }
            catch (ArgumentOutOfRangeException exp)
            {
                MessageBox.Show(exp.Message);
            }
        }
If the value of Elevation Angel > 27 or < -27 degree application will trow a “ArgumentOutOfRangException” .
That’s all, just run the application and give the textbox value in between +27 to -27, you will see the Kinect motorized tilt is changing with the camera angel. Below is the screen shots with Angel 0, +27 and – 27 degrees where as the position of Kinect device was same.
Check out the quick Video demo as well.
Note, this features is not for frequent uses. Generally this need to setup and track skeleton during the start up of your Application.
Read Kinect SDK Documentation for more information.
Download Complete Project
Till now whatever we have learned we learned about a single Kinect Device. In my next two post I will discussion about configuring multiple Kinect Devices and then will develop a application using Multiple devices. Then we will bake with Skeleton Tracking and Audio fundamentals. So lot’s of interesting stuff on the way !!!
Hope this helps !
Cheers !!
AJ


thank you much!
LikeLike
I’ve got one (simple?) question.
You wrote that there would be an error if one types in something beneath or above -27 to +27.
But how did you define the range for “ArgumentOutOfRangException” (do you need to type it anyway)?
I may just don’t see it, sorry if that was stupide.
LikeLike
Kinect sensor can be tilt up to 27 degree up or down horizontally and this values are fixed. Kinect SDK has two read only properties
MaxElevationAngleandMinElevationAnglewhich returns the maximum and minimum elevation angle for the Kinect sensor.The values of these two properties are simply defined with +27 and -27 in class library as show in below:
public int MaxElevationAngle{
get
{
return 27;
}
}
public int MinElevationAngle{
get
{
return -27;
}
}
So, if you are changing the ElevationAngle and values goes out the range of Min or Max. It will throw the exception.
You can also try something like
private void SetKinectSensorAngle(int angleValue){
if (angleValue > sensor.MinElevationAngle || angleValue < sensor.MaxElevationAngle)
{
sensor.ElevationAngle = angleValue;
}
}
Let me know if you need further help.
Thanks.
LikeLike
Hi Abhijit,
I tried your code, its working fine.So by using this we can track higher and lower objects also, by adjusting y-axis(elevation angle). Like this any way to adjust width of sensor.I mean adjusting x axis of sensor. Instead of moving sensor in x- direction every time, changing the camera direction by coding. Can you please help to adjust the sensor in x-direction. Thanks in advance
LikeLike