
Azure Bot Service is the Bot-Service powered by the Microsoft Bot Framework running on Microsoft Azure platform. It provides the integral components for developing bots, Bot Builder SDK and the Bot Framework for communicating bots to channels.
With the Azure Bot service, you can develop, connect, deploy and manage intelligent bots faster than ever. Be it is development, configuration, connect with a channels, adding intelligence everything! can be done in a single place – in fact over few clicks.

Fig: Azure Bot Service – Quick View
In this deep dive article, we will take a lap around creating a bot using Azure Bot Services and setting up your own Continuous Integration(CI) and Continuous Delivery(CD) pipelines from Dev. environment to production. We will also explore how to set up a gated build to validate and merge changes to master branch as a branch policy through a Pull Request and link it with Continuous Integration(CI) build definition to prepare a package for releasing it to different environments.
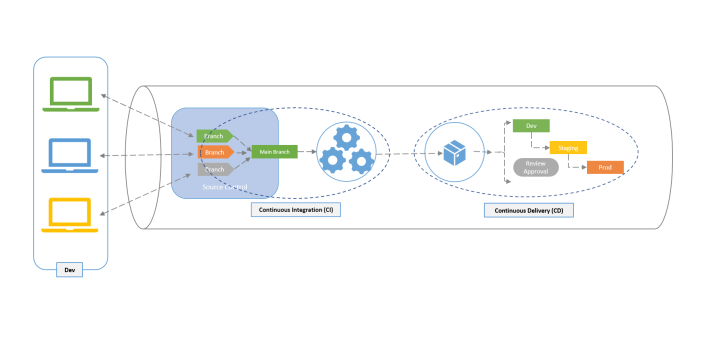 Fig: Illustration – CI/CD Pipelines for DevOps Pipeline
Lastly, we all take a looks on quickly monitoring aspects for bot using Application Insights and Azure Bot Analytics. Overall this article will give you an end-to-end aspect of Bot development and operation process.
Following are the high-level topics we will be covering in this article
- Rapid development of a bot using Azure Bot Services
- Setting up code repository from the pre-generated code
- Setting up Continuous Integration(CI) and Continuous Delivery(CD)
- Enabling branch policies with gated builds for pull requests
- Deploying Bot into Deployment Slots using CI/CD pipelines
- Understanding Telemetry and Analytics for the chat Bot
Note: This article is not for a detailed walkthrough on developing a bot using Microsoft Bot Framework, or understanding the Bot Framework – such as Bot Builder, Bot Connectors or Internal of Bot development like Dialogs, Forms Flows etc. I may cover them in a separate post in future. This post will be very focused towards building up a Bot quickly using Azure Bot Services and setting up DevOps for it.
I wrote several Post @ Daily .NET Tips website related to Bot Development quite a few times back, you may want to take a quick look at them
As part of this exercise and tutorial, following are the basic prerequisites for setting up the development environments and implementing the CI/CD Pipelines for the Bot
- Visual Studio 2017
- Azure Subscription
- Visual Studio Team Services Account
Rapid Development Bot Using Azure Bot Service
Azure Bot Service provides an end-to-end integrated environment for setting up backend services bot development. You can develop a bot, deploy it, connect it to different channels, test it in inbuilt web chat emulator, and modify the code from your web browser itself.
In this section, we will create the basic chatbot using the integrated services and will explore several sets of features that Azure Bot Service provides.
Creating the Web App Bot
An Azure Bot Service Bot deployed to an Azure App Service and linked it with Azure Web App Bot, which works like a wrapper for App Services and interfaces for external channels.
Login to Azure Portal and follow these steps to create the Bot.
- Click on Create a Resource and then select AI + Cognitive Services -> Web App Bot
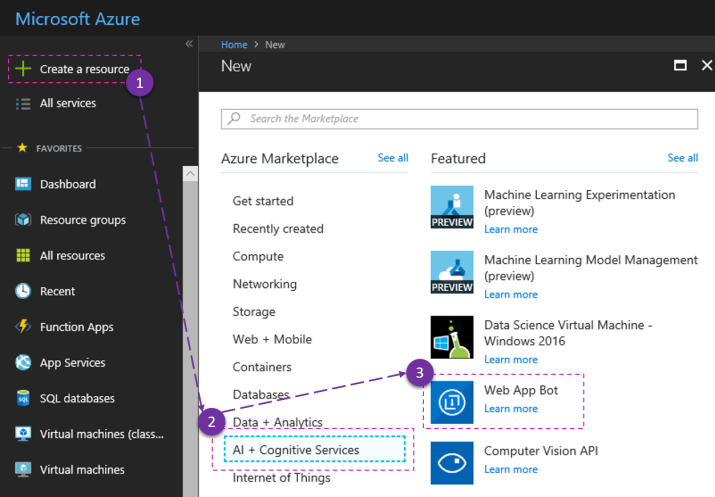
Fig: Create New Web App Bot
- Fill all the required details in the new Web App Bot blade and click the Create button to initiate the bot creation process.

Fig: Web App Bot Properties
During Bot creation, we have provided all the required details related with the bot, including the Bot Template, Storage account to be associated with Bot, Application Insights along with the App Services details. In this example, we have given the bot name as “SmartTaskBot” and all the resources we have created under “SmartTaskBot resource group”.
When you create a Bot using Azure Bot services, you can choose any of these five different types of Bot Template.

Fig: Bot Templates Selection
If you want to build a proactive bot based on Azure Function Trigger, you can choose the Proactive Bot Template. Language Understanding Bot template used for integrated Natural Language Processing(NLP) with LUIS. Building a Bot using Form Flow dialogs choose the Form Template, and choose Q&A maker’s bot for a simple question and answer Bot. In this case, we will use the “Basic C# Template” which will create a simple echo bot.
After clicking on the Create Button, it may take a while to create all the Azure services and Bot to be ready.
Behind the Scene
Once we click on “Create” button, several azure resources span in the background. Once the creation of the resource is successful, from the “Resource Group” select the “SmartTaskBot” resource group to quickly look around all the resources created for this Bot.
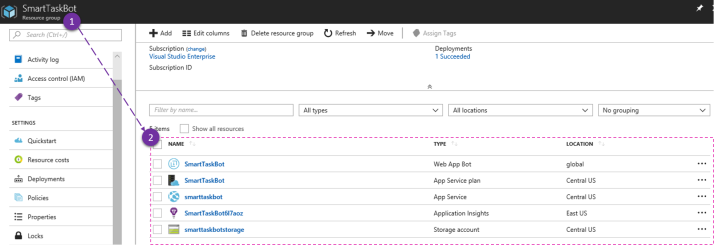
Fig: Azure resources for Azure Bot Service
During the process of Bot Creations, Azure Bot Services creates following resources.
- Web App Bot
- App Services Plan
- App Service
- Application Insights
- Storage Accounts
At a high level, if we look around the architectural perspective here is how it looks like.
 Fig: High level architecture with Azure Bot service resources
Azure App services host the code for your Bot, and the Web App Bot connects with the App Services using the Messaging endpoint.
- App Services URL – https://smarttaskbot.azurewebsites.net
- Messaging endpoint for the bot – https://smarttaskbot.azurewebsites.net/api/messages
Web App Bot is the primary interface for you. It includes features like Testing Bot, Building Bot, Bot Analytics or even managing Bot Channels. In the Overview blade, you can find high-level information about your bot and You will find most of your bot’s management options under the Bot management section.
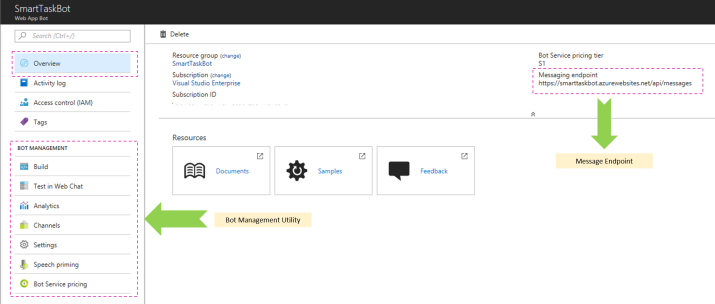
Fig: Azure Web App Bot Interface
Having all said, so far, we haven’t any development, but our Bot is ready based on the template we choose. Let’s give it a try
Try out the Bot
So, we have a running bot. Let’s try it out. Select the SmartTaskBot (Web App Bot) and then select “Test in Web Chat” option available under the “Bot Management”. As we created a bot from the Basic template, you can type any word and the bot will echo back your input.

Fig: Test Bot in Web Test Chat Window
Start a conversation with Bot! As a basic template, the bot behaves like an Echo chatbot, so whatever you type it will reply the same.
Configuring the Channels for Bot
Web App Bot also supports configuring and working with Channels. Navigate to the Channel option under the Bot Management Section and configure the channels your bot uses to communicate with users.
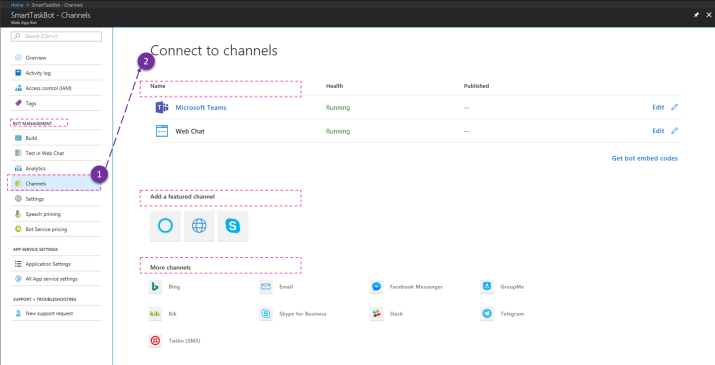
Fig: Configuring Bot Channels
Use this section for adding new channels, removing channels or updating the configuration for existing channels.
Editing Code in App Service Editor
As we discussed many time earlier, Web App Bot is your one-stop solution. From the Bot Management, select “Build” and choose the option to work with your code.
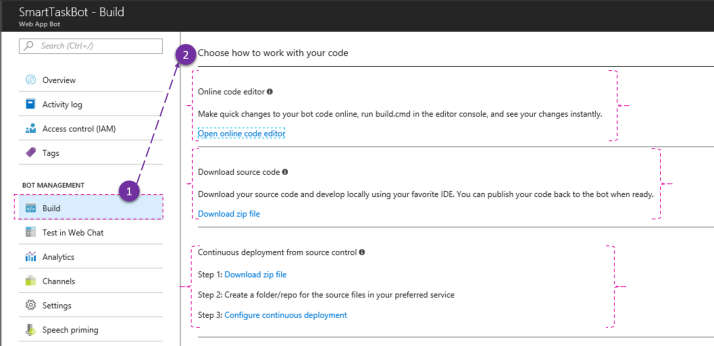
Fig: Editing Code for Bot
You can make quick changes to your bot code online, build the code in the web editor, and test your changes instantly. Select the Open Online Code Editor to open the code in App Services Code Editor.
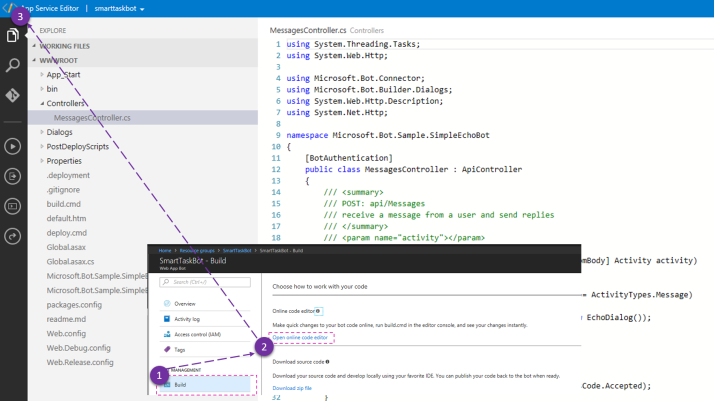
Fig: Editing Code in App Service Code Editor
Azure Bot Service is an accelerates bot’s development platform. It enables us to manage end to end bot development and deployment. In this section, you have learned how to create, test and connect a bot using Azure Bot services. You have also learned about internal of services created through this Bot services service and how they are interlinked. You may read out Bot Service Documentation for more details on developing bot using Azure Bot Services.
Now, as a next step, we will take up the code from Azure service and set up the Git Code Repository and connect with our local development editor.
Setting up Code Repository
The App Service Code Editor also allows us to connect with Git Repository and publish the code, however, we will get the code downloaded and will use Visual Studio to take it further. In this section, we will explore how to get the code from Azure Bot services and download it and then develop locally using Visual Studio.
Download the Auto Generated Code
Once again select the “Bot Management” -> “Build” option from Web App Bot and Click on the “Download Zip file” option available under the “Download Source Code”.

Fig: Download the source code
This process will create a Zip file package and would let you download the complete source code. Save the source code, unzip it and open it in Visual Studio.
Even though Zip file has the same name of the Bot you have provided, the solution comes within has a different name which comes as part of the template. I hope this will be changed in future.
For now, I have updated the projects and solution files to match the name that we provided for our Bot.
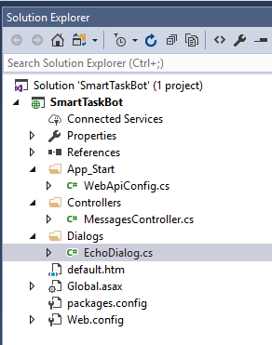 Fig: Initial Solution Structure
Now we have the source code in our favorite editor, time to push the code in source code repository.
Setting up VSTS Team Site
Open your Visual Studio Team Services account and create a new project for the Bot development. While creating the team project, make sure you choose Git as version control for the project.
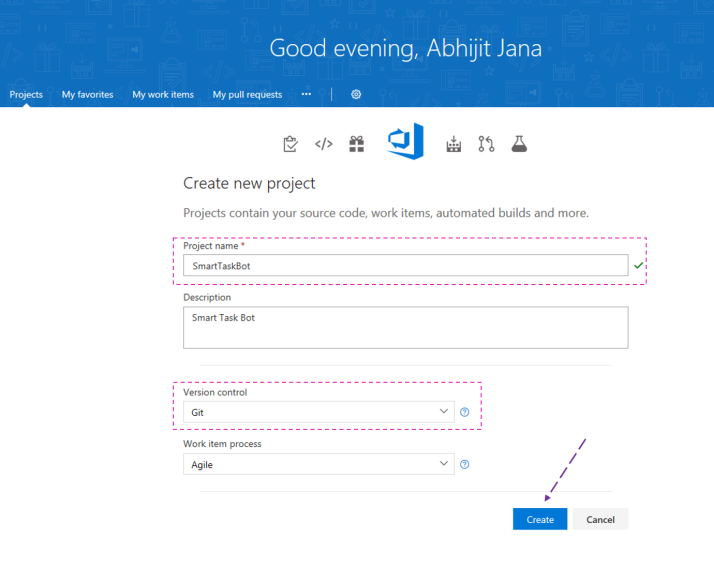
Fig: Create a new team project in VSTS
Once your team project is ready, take the Git repository URL to push the code from Visual Studio to Git Repository.
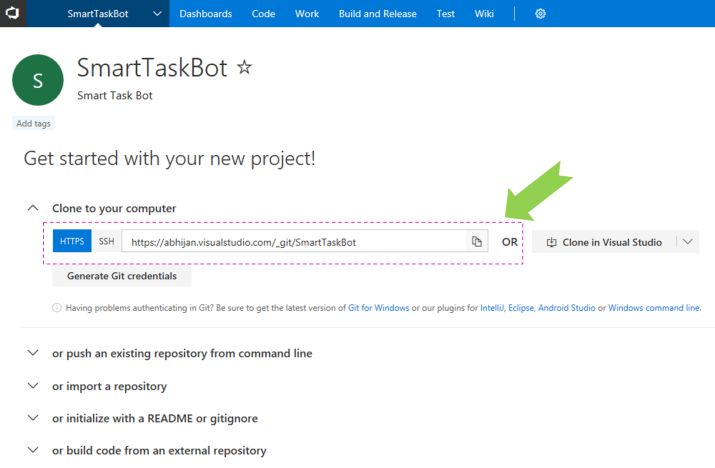 Fig: Get GIT repository details
Publish the Code to Git Repository
From the Visual Studio, Open the Team Explorer and push your local code to remote repository
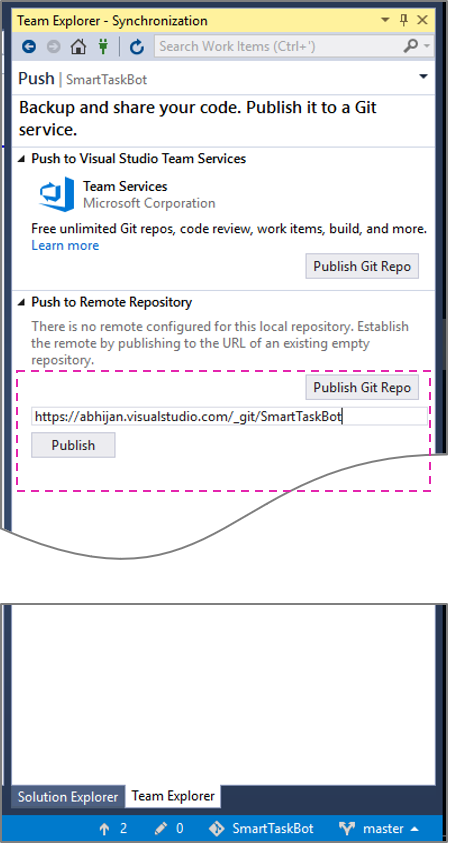
Fig: Publish the code in remote repository
Once the code is published, go back to your team project and verify your code is published and available in the remote git repository.

Fig: Code in Remote Git Repository
That’s pretty much from here on setting up the code repository. So, go ahead test it out quickly.
Test your Code Repository
It is a straightforward process just to ensure everything works fine. Do some changes in the solution files and push the code in the GIT.
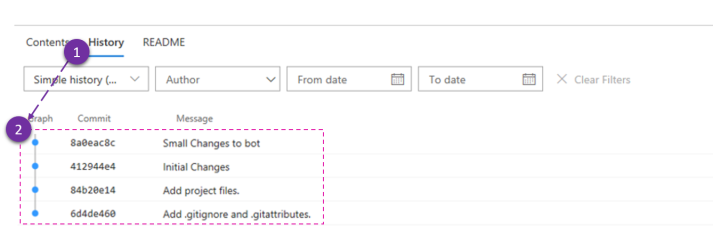
Fig: Testing Code Repository Changes
You can modify your bot, changes business logics, Bot behaviors and push your code now. Once the code is published to Git Repo and find the reflected changes, you are good to go.
In the next step, we will enable the Continuous Integration(CI) and Continuous Delivery(CD) for the overall integration and deployment.
Enable Continuous Integration(CI) and Continuous Delivery(CD)
So far, we haven’t deployed updated code, the only thing we have done is pushed it into our source repository. App Services is still running with the initial code created during the Bot service creation process. In this section we will explore how to enable the Continuous Integration (CI), so that code pushed to git is merged with master branch and then automatically deployed to App Service using Continuous Delivery(CD).
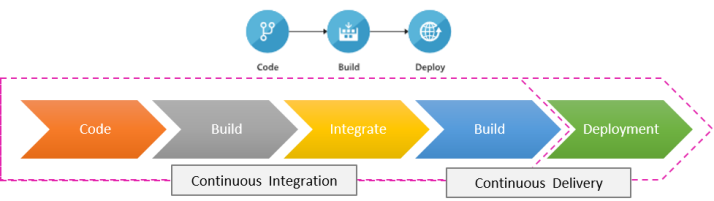
Fig: CI/CD Illustration with Phase of complete life cycle
Overall the process of Continuous Integration(CI) & Continuous Delivery(CD) capabilities allows us to establish an end-to-end delivery platform that enables rapid development & deployment of software system repeatedly with minimal manual work.
Different Option to Setting up CI/CD Pipeline
There are several ways to set up CI / CD Pipeline for your Build & Release management. Some of them are:
- Manually Configure Build definition and release definition using VSTS
- Configure it from Azure Portal for specific App service deployment
- Configure the Continuous Integration(CI) & Continuous Delivery(CD) using Visual Studio Tooling Support
In this article, we will choose the #3 and will enable the Continuous Integration and delivery from Visual Studio.
Enabling CI/CD Pipeline from Visual Studio
Go back to your bot development solution in Visual Studio. Right-click in the solution and select Configure Continuous Delivery option from the context menu.
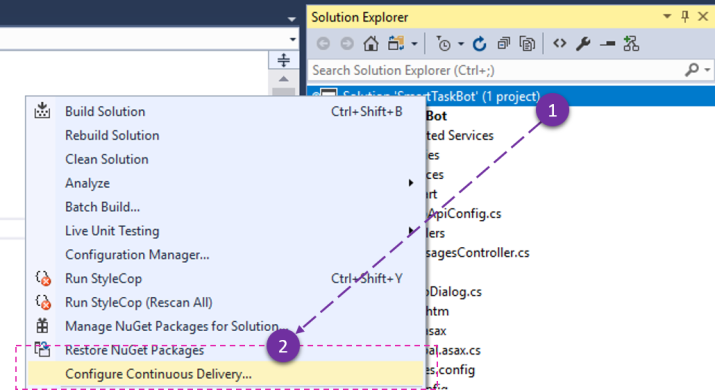
Fig: Start Configuring Continuous Delivery for Visual Studio
This will bring the Configure Continuous Delivery dialog windows inside Visual Studio. Select the branch as master (as this will be the final branch for this solution) and choose the respective subscription. Make sure you choose the right “Azure App Service” here. In this case, we must choose the “smartaskbot” app service.
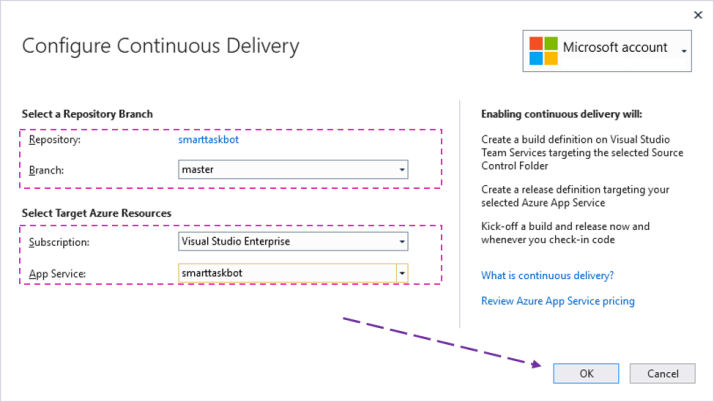 Fig: Configure Continuous Delivery
Once done, select “OK”.
That’ it. Visual Studio, Visual Studio Team Services, and Azure will take care of rest.
Visual Studio will configure the resources for continuous build delivery on Team Project smarttaskbot to App Service smarttaskbot. You can review all the logs from the Output windows of Visual Studio by selecting show output from “Continuous Delivery Tools”.
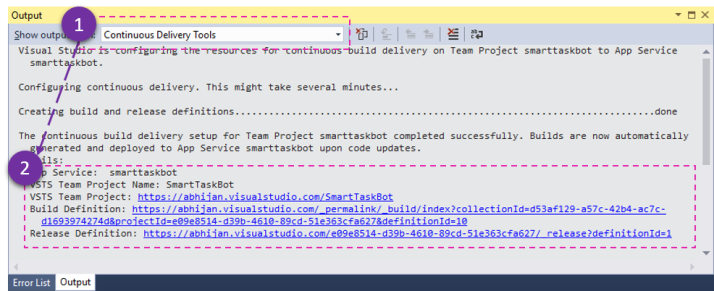
Fig: Continuous Delivery Tools in Output Window
Visual Studio Tip: Get most out of Visual Studio Output Window
Once the overall process is complete, you can find the URL for VSTS Build Definition as well as the Release definition. Click on those links to review the build and release definition created through the process.
Review the Build & Release Pipeline
From the output window, click on the Build and Release definition to review them. Alternatively, you can open the build and release definition by opening your Visual Studio Team Services Account and select “Build and Release Option” from the top menu.
Visual Studio Team Services now contains following two definitions:
- Smarttaskbot-CI – For Continuous Integration – Integrate the code from local to master branch
- Smarttaskbot-CD – For Continuous Delivery – Automatically publish to code Azure App Services
To understand this relationship better follow these steps
- Select Releases Tabs from the Build and Release menu.
- Click on the “…” next the smarttaskbot-CD definition
- Select the Edit option

Fig: Editing Release Definition
Following screen will appears which shows how the Build Drop from CI is linked with the Environment deployment. Drop folders take the build drop packages created by the smarttaskbot-CD and then deployments happen.

Fig: Release Definition View
Click on the Drop icon under the artifacts options to get some more insights. The build drop folders are the location where artifacts from the smarttaskbot-CI are getting published for the deployment. Then as a part of next step, the deployment process picks up the drop and publish it.

Fig: Build Drop for CI Build
To know more build and release management process, select the individual definition for both smartaskbot-CI and smartaskbot-CD and review the internal task and flows.
For an instance, if you edit the task for deployment, you will find “Deploy Azure App Service” task is the only task which is getting executed and deploying the build to the Azure App services – smartaskbot

Fig: App Service Deployment in Continuous Delivery
With respect to building definition, you must understand is “Enable Continuous Integration” option under the Triggers tab for the smartaskbot-CI build definition.
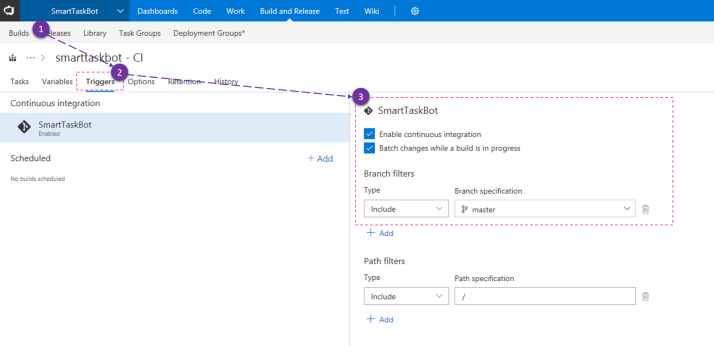 Fig: Enabled Continuous Integration in Build Definition
This is the default configuration created during the creation of CI/CD pipeline. This indicates, the CI build will trigger as soon as there are any changes in the master branch.
With all that, when you clear about all the backend definition and their working principles, you must go ahead and test the overall CI/CD Flow.
Test your Continuous Integration(CI) & Continuous Delivery(CD) Pipeline
You are done with CI/CD setup. At this point in time, if you push any changes from your local dev environment to Git, it will automatically trigger the CI Build and followed by a deployment to the App services using the release pipeline.
You can review the similar process as shown in below screenshots post your code is pushed to Git.
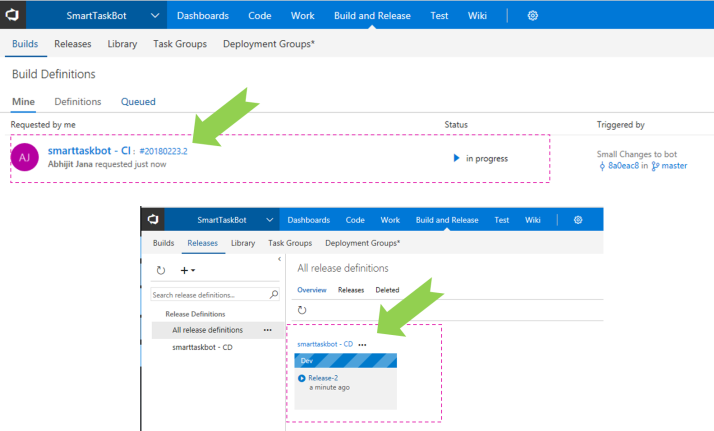
Fig: Execution of CI/CD Pipeline
Once your modified code is pushed to git, you can respectively review the build and release execution from the VSTS.

Fig: Release completed through CI/CD Pipeline
Once the deployment is completed, if you go back and test your Bot from the Web Chat Test Window, you will see any updates made to the bot is getting reflects.
This covers and end to end integration flow from your Development IDE to production release through CI/CD Pipeline. This streamline your end to end development and release management for your Bot.
Enabling Git branch policies and Gated Build in CI/CD Pipeline
Till now our Continuous Integration process was merging the code directly to the master branch, which should not be the ideal case for any development process. Ideally, as a developer, we should be working our own set of dev branch/feature branch and then the merge to master branch should happen only via Pull Request.
In this section let’s learn how we can add branch policies to master branch and enable a gated build for the developer to verify their code before pushes to code in master.
Setup Build Definition for Gated Build
First, we will create another build definition by cloning the existing (CI) build definition. Why so? Because as an overall process the build will still validate the same set of the task from the code, the only thing we need to disable the new build from Continuous Integration.
From the VSTS Team Project from the VSTS Team Project
- Open the Build definition list and click on the “…” icon on the smartaskbot – CI build.
- Then click on the “Clone” option
- Then change the build name to “smarttaskbot – Gated”
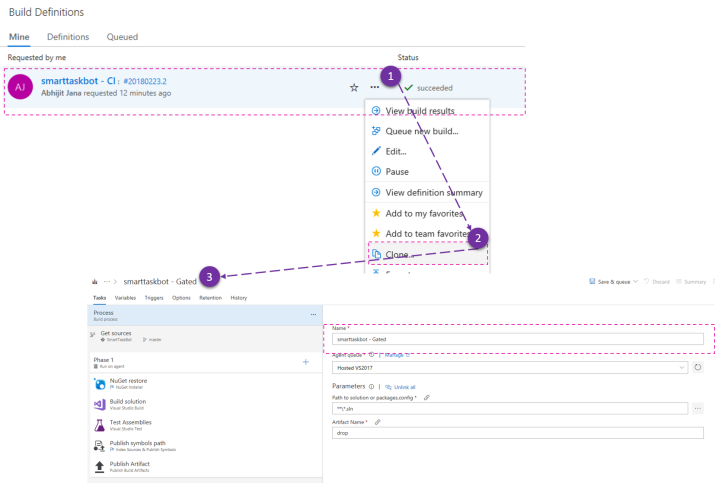
Fig: Define the Gated Build
From the newly created build definition, navigate to triggers tab, uncheck the option for “Enable Continuous Integration”
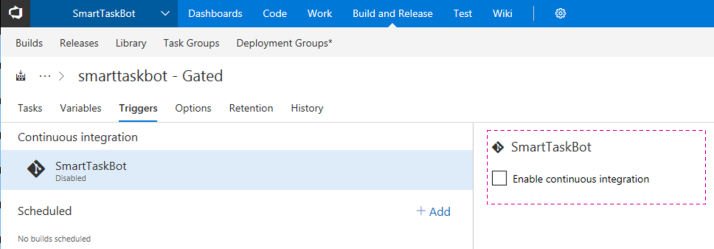
Fig: Unchecked CI for the Gated Build
Save the build definition.
Once the build definition is created we must link the build definition with the branch policies to trigger with.
Attach Branch Policy for Pull Request
From the VSTS Team project
- Select the Settings icon and select “Version Control”
- Select the master branch under the repository
- Select Branch Policies under the “Security for master branch in SmartTaskBot”
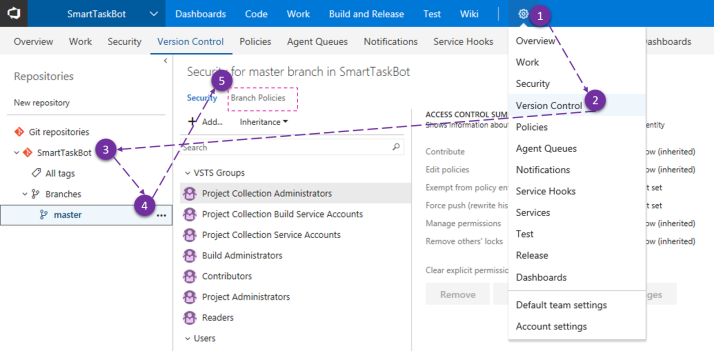
Fig: Setup Branch Policies
In the Branch policies settings, you can see the types of rules you can specify, including blocking a pull request from completion if the build is failed. You can also set mandatory linking work items or have a code-reviewer approver with this. With all these, you can ensure the level of quality for your code is getting committed.
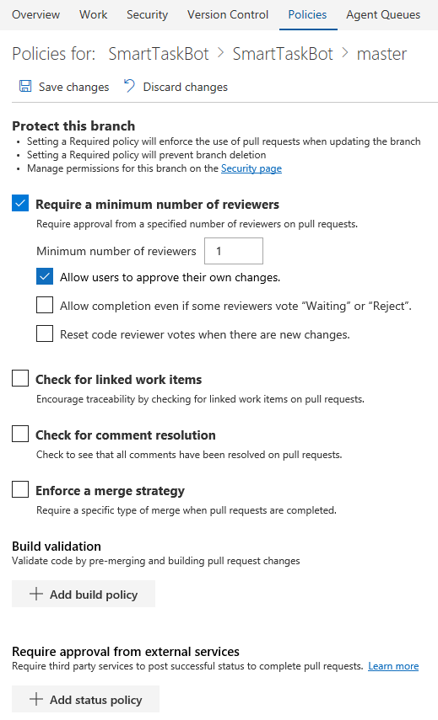
Fig: Master Branch Policies setup
In this case, we just keep an additional level of approver (I have checked the option for “Allow users to approve their own Changes” – so that I can approve the Pull request for testing purpose). This should not be the ideal case when a team is involved, it must be reviewed by peers) and will add the Build Policies.
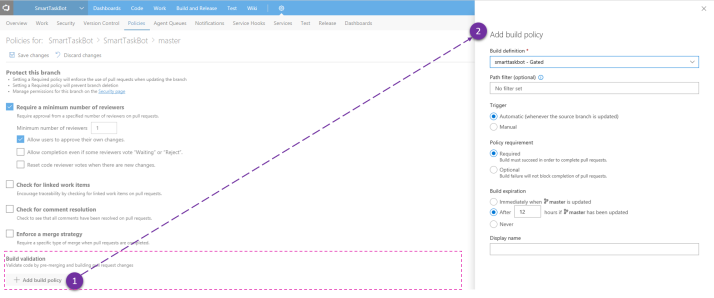 Fig: Add Build Validation in Branch Policies
One the Build Validation policy added and enabled, save the branch policies. With that, you are done with the configuring the gated build for Git.
Test out the Gated Build
As we have the new branch policies in place, going further we won’t be able to push any code directly to the master branch, it must be through the pull request. Create your local set of working branches, do all the necessary changes on your local branch and push the branch to Git for a remote copy.
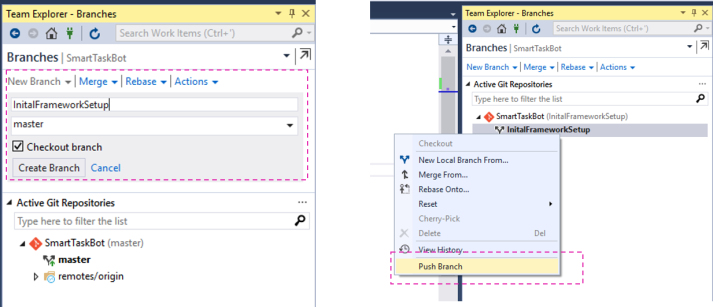
Fig: Working with Local Branch
Once your final changes are pushed and you think you should merge now, raise a pull request from VSTS.
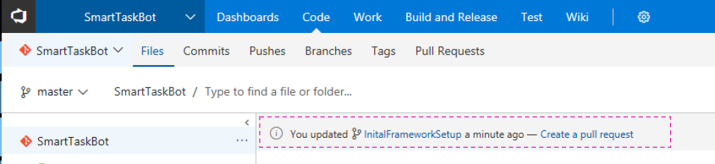
Fig: Create new pull request
Validate the pull request details in the New Pull Request form and select on “Create” pull request.
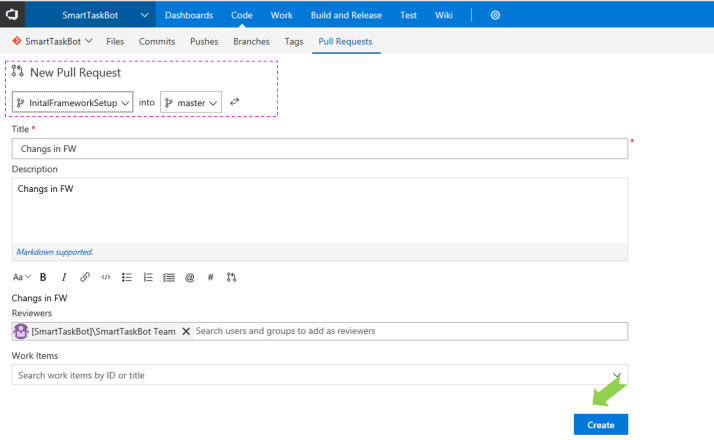 Fig: Update Pull request details
Once the pull request is raised, it will automatically start executing the gated build we created for this and would also wait for approval. Once they approval is done, and gated build is successful you need to mark the pull request as Complete, or you may set this Autocomplete.
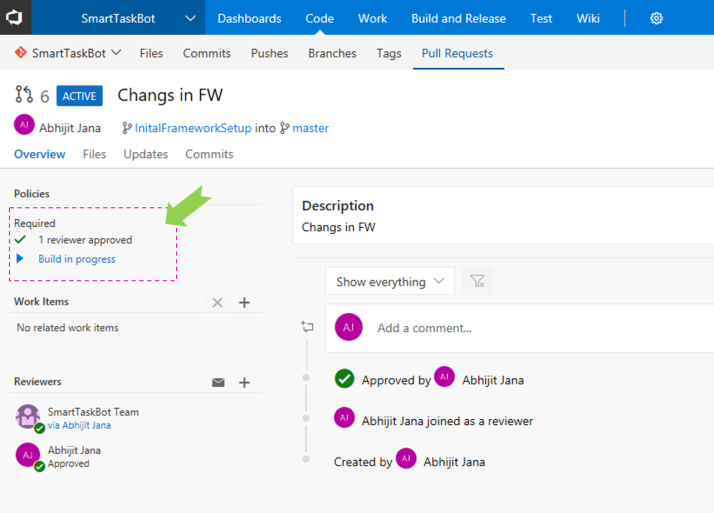
Fig: Pull Request Build in Progress
Once the overall process is complete, VSTS will go ahead and merge the code the master branch which will trigger the CI Build (smartaskbot – CI), which will eventually trigger Smartaskbot – CD for the continuous delivery post its completeness.
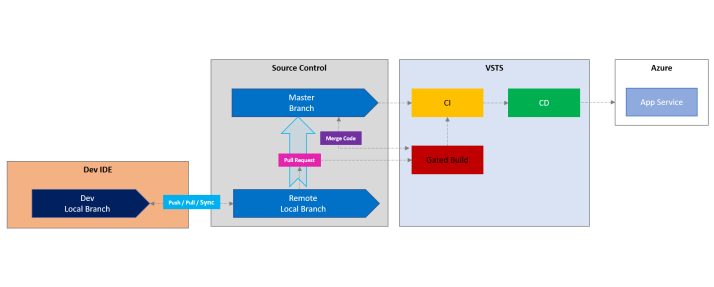 Fig: Overall Process Flow from Dev, Source Control, VSTS
In this section, we have learned how to be established much more matured process using a gated build and merge the code with you master branch using pull request.
Multi-Environment deployment using CI/CD Pipeline
Another important aspect of overall delivery to have the deployment of your solution in multiple environments. It could be in Dev for internal dev users, Staging testing, pre-production for a limited number of end-user and finally in Production. Ideally, our deployment should be published through multiple environments for the better sanity of the build before it goes live.
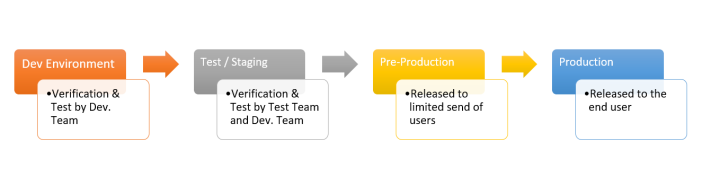
Fig: Illustration of Multi-environment deployment options
In this section, we will explore this using two environment – Staging & Production. To make this simpler, we will rename our existing Dev Env. to Staging to be used by both dev and test team and will create a new environment for production.
Modifying Release Pipeline for New Environment
Open the Release definition for editing and clone the existing dev. environment as shown in the below screenshot.
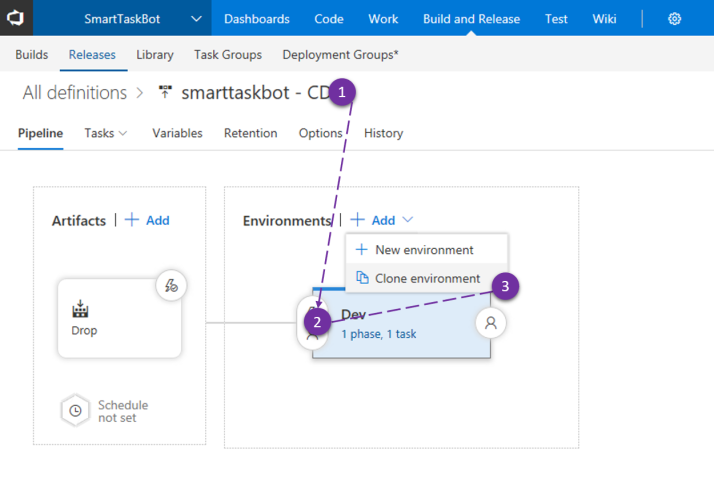 Fig: Clone Existing Environment
You can also create a new environment as well, however cloning the environment would make it simpler. Following images show linking of different environments in the new deployment pipeline.
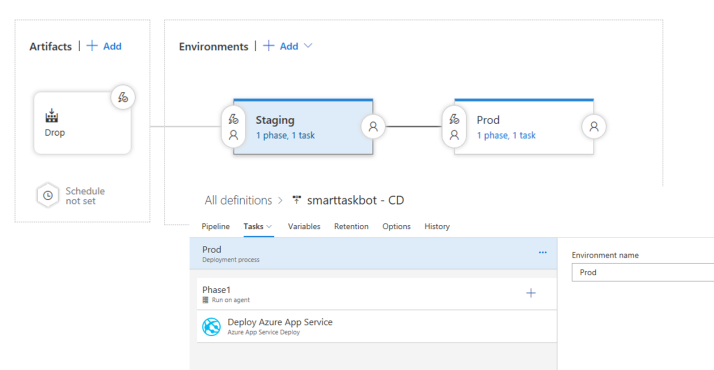
Fig: Deployment pipeline with multiple environment
For make it more realistic in this example, as I said earlier, we have renamed our dev. environments to Staging, and added another environment called production.
Final Production deployment would be on actual app services deployment. So, what about deployment in Staging? Well, we will use the Deployment Slots for App Services here.
Creating Deployment Slots
Go back to Azure Portal, and Open the Smartactbot Azure App Services, and add deployment slots called “Staging”
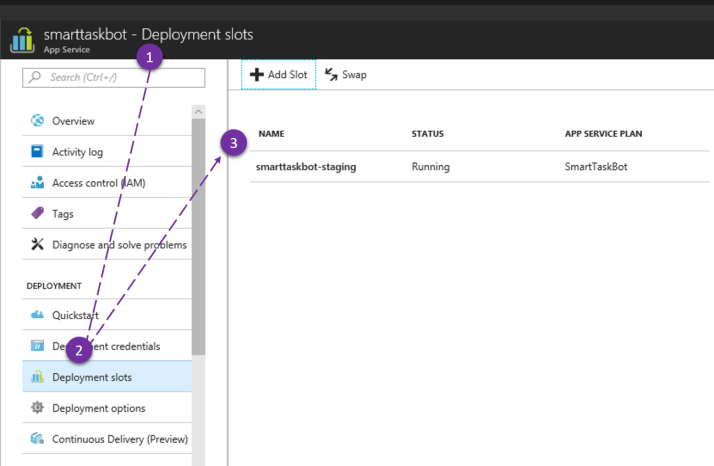
Fig: Deployment Slot for Staging
Once the deployment slot is ready, go back again to the release definition in VSTS and edit the Staging environment. Select “Deploy to Slot” checkbox in the deployment section and select “Staging” slots from the dropdown list.

Fig: Deploying to Deployment Slot
We are done with the multi-environment deployment setup, and this is how the pipeline for deployment looks like.
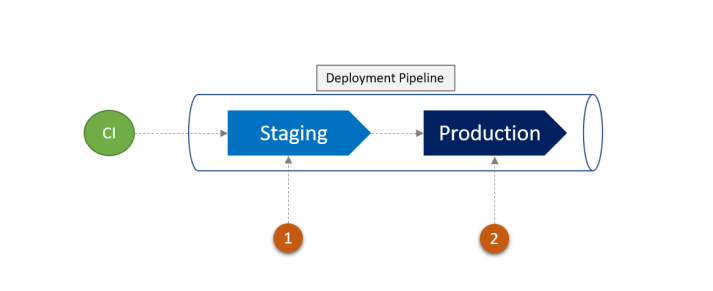 Fig: Current deployment pipeline
Let’s test the multiple environment deployment.
Test Multi-Environment Deployment
At this point of time, if you push a new change, you will find the after successful execution of build the deployment pushes to back to back after two environments, first on staging and post completion of staging the automatic deployment will be carried forward for the production environment.
![]() Fig: Deployed in Multiple Environment
Fig: Deployed in Multiple Environment
Two of these green boxes indicated the deployments to both environments are successful.
Well, though it’s working as expected, this is not something we would opt for. Publishing in any environment after another must be going through a approval process. For an instance, once test team certifies the release from Staging we should only push the deployment to production. Let’s see how we can add pre-deployment approval for new releases.
Configuring Pre-Deployment Condition
As part of this step, we will add a pre-deployment condition which will trigger an approval request to the pre-defined set of people. The release will only move to next step post the approval.
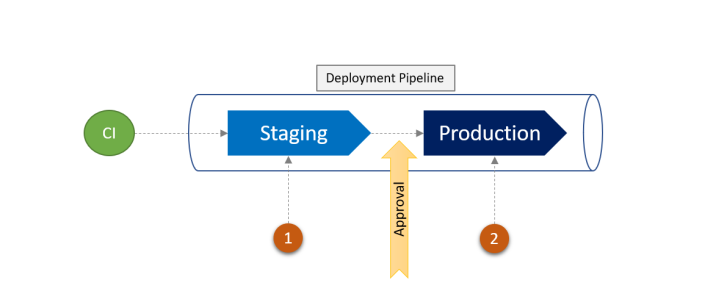
Fig: Illustration of Pre-Deployment Approval
To add a pre-deployment condition, Edit the release definition (smartaskbot- CD) and select the pre-deployment trigger option for the Prod environment.
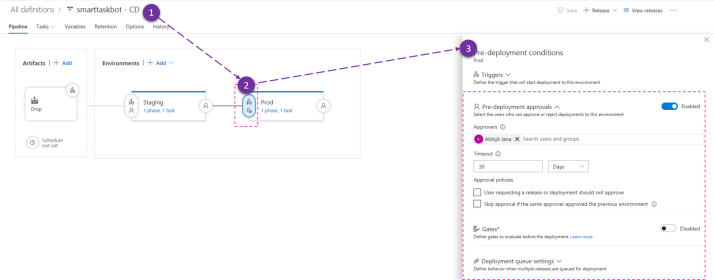
Fig: Setup pre-deployment condition
Once the pre-deployment condition is in place, you should also define the trigger of the approval. There are three options for trigger
- After Release
- After Environment
- Manual Only
We will select “After Environment” which is nothing but “Staging” in this case. This means, when we have an environment deployment happen, it will trigger a pre-deployment approval.
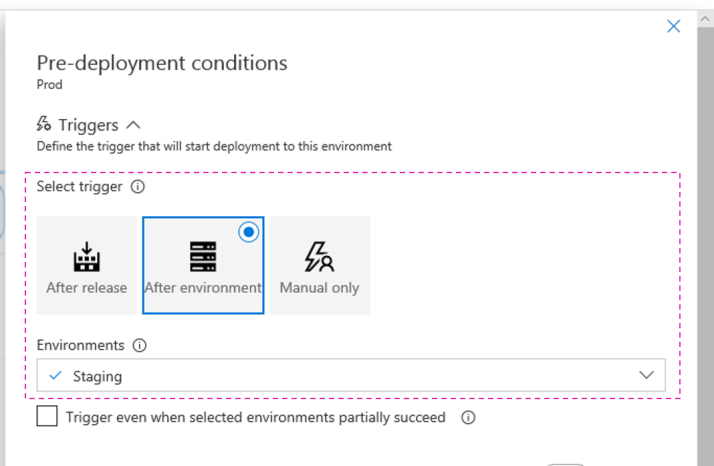
Fig: Pre-Deployment Trigger
With this, we conclude our setup for multi-environment setup for deployment we pre-approval condition.
Test Deployments with Pre-Approval Conditions
At this point in time, if we again trigger some build by changes in our code, the CI-CD pipeline will continue till deployment in the staging environment. Post that, it will send a notification/email for approval. Post-approval, the deployment will proceed in the production environment.
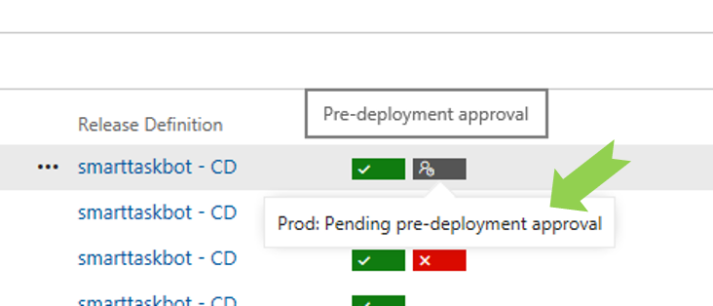
Fig: Waiting for Pre Deployment Approval
Waiting for Pre Deployment Approval. Once the build is approved by the approver the release to production will happen. This will ensure every environment build is getting verified and approved before we push it to another environment.
Reviewing Telemetry and Analytics for the Bot
One more important aspect DevOps is to understand the real usages of your application and monitor the telemetry or analytics. While this is another long topic to discuss, I would keep this very short and simple with respect to the tooling aspect of Azure Bot Services.
Select the Web App Bot and select Analytics under the Bot Management option to review analytics and usages of the bot.

Fig: Bot Analytics from Azure Bot Services
Application Insights helps us to track applications health in real time. You can track your application availability, performance issues, user’s session and diagnose crashes faster than ever. It provides a real-time dashboard for your app to monitor your application. It is fast, very easy to configure and provide very powerful insights for your application. We can capture the real-time telemetry using Application Insights for our BoT as well, and as part of the overall process of Bot Creation, Azure Bot services creates the application insights resources.
From the Bot resources, you can open the Application Insights portal to review the telemetry event captures during the process of your bot execution. Following screenshot shows a representational information from application insights.
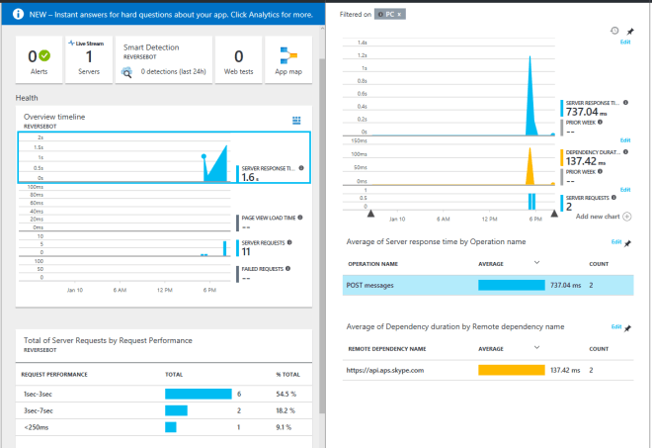 Fig: Reference Application Insight metrics for Bot
With this, you can monitor your bot health and messages and take proactive action based on them.
Summary
Overall the process of Continuous Integration(CI) & Continuous Delivery(CD) capabilities allows us to establish an end-to-end delivery platform that enables rapid development & deployment of software system repeatedly with minimal manual work. With this deep dive article, we have created a bot using Azure Bot services, and then enabled the Continuous Integration(CI) and Continuous Delivery(CD) with the help of Visual Studio 2017, Visual Studio Team Services (VSTS) and Azure. We have also learned how to monitor bot analytics and telemetry using Azure Application Insights.
This cover a 360-degree view of Azure Bot Development and I hope this post was useful to you. Do let me know your comments or thoughts on this. Feel free to ask me any questions related to Bot Framework and developing bots. I would be happy to answer.
Further Study
You can read more about Bot Framework and Azure Bot Services – @ Microsoft Bot Framework Documentation
Cheers!
Abhijit


Excellent Abhijit. Great Article.
LikeLike
Thanks Arun.
LikeLike
Nice articles for developer and it’s detailed and explained very well.
LikeLike
Thanks buddy !
LikeLike
Awesome up to date blog! However, I had a question. When we talk about DevOps. To me it sounds part of the process to automate as much as you can. However I see no mention of ARM templates or anything that would automate the deployment of the necessary Azure infrastructure when doing CD. What are your thoughts ? Every blog, article I see, including this one seems to leave out the part on that. Most of the time it’s created upfront before the whole tutorial in some way, or through VS IDE.
LikeLike
Hi Abhijit, Great article!
I have a doubt regarding the testing of Staging and Production environment bot. How can we check whether the bot in staging environment is responding as expected? Can we test it in Bot Framework emulator or in the Test in Webchat option in anyway?
LikeLike