The Global Assembly Cache (GAC) is a Cache for globally available Assemblies. Most of the shared assemblies are installed inside GAC to shared across different applications. The Global Assembly Cache tool (Gacutil.exe) allow us to manipulate the contents of the global assembly cache along with install and un-install Assembly. During the development, we generally take help of gacutil from command prompt to install or uninstall assemblies into or from GAC. This is a repetitive process, every time you made some changes in your library you might need to deploy it into the GAC. Visual Studio has a nice feature called Pre-Build and Post-Build events. Using these events we execute some specific commands before or after the build. In this post I am going to show you how we can configure the post build event to deploy an Assembly to GAC.
Installing Assembly to the GAC requires admin privileges. Visual Studio must be started with elevated rights. From the Project Properties Window Page of the class library ( which you want to put into GAC) , Navigate to “Build Events” Tab. Build Events tab having two command line option for both Pre-Build and Post-Build event. We will be configuring the Post Build Event to install the dll into GAC because we want to put the dll into GAC after the successful build.
Below is the typical syntax for installing Assembly into GAC from command prompt which we used generally
gacutil [options] [assemblyName | assemblyPath | assemblyListFile]
Visual Studio Build Events also use the same syntax. But, the interesting part is the Location of GAC. Yes, the GAC was split into two. We all knows, .NET 4.0 introduced CLR 4.0. NET Framework 2.0 and .NET Framework 3.5 targeted to CLR 2.0 and .NET Framework 4.0 is targeted to CLR 4.0. The GAC is now split into private GAC’s for each runtime that targeted differently to CLR 2.0 and CLR 4.0 . I will recommend you read the article “Understanding the CLR Binding” for more details.
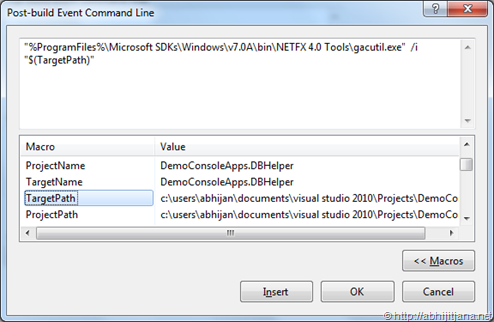
Let’s assume, the Assembly is targeted to .NET 4.0 . To Add this Assembly, we have to specify the below Post-Build Command.
"%ProgramFiles%\Microsoft SDKs\Windows\v7.0A\bin\NETFX 4.0 Tools\gacutil.exe" /i "$(TargetPath)"
$(TargetPath) is a pre defined macros that returns the dll full path.
Ok, that’s all. Save the file and build your class library. You are expecting the assembly to be installed into GAC. But after build you will get below error indicates something went wrong.
From the error message it is difficult to understand what’s went wrong. In this situation Output window is very useful. Below is the captured details by out put window.
Well, if you know what is assembly and what is shared assembly, you must be knowing about Strong name. A Shared Assembly must have a strong name to uniquely identify. Read more about strong name
So, let’s quickly create a strong name using Strong Name tool . Open Visual Studio Command Prompt and type the below command.
sn –k > c:\mytestkey.snk
This will generates and writes the public and private key pair in C:\mytestkey.snk file. If you are interested, you can read Strong Name Tool (Sn.exe) for further details on Strong Name Tool.
Once you have done with the snk file generation, go back to visual studio > Properties Pages > Signing Tab. Enabled the “Sing the assembly” option. This will allow you to choose the “snk” file.
From the “Choose a strong name key file” dropdown, browse the newly generated snk (mytestkey.snk) file.
That all, now you can build the application and check the “Output window” as well for details.
Check for your GAC, you will find your assembly installed there.
For .NET Framework 3.5, if you have use below command as post build event
C:\Program Files (x86)\Microsoft SDKs\Windows\v7.0A\bin\gacutil.exe" /i "$(TargetPath)"
So you really don’t not need to run gacutil command from command prompt ever time after successful build. Visual Studio will take care of each and every thing automatically. For this type of scenarios, Output window is very important, because you can get details of the execution from here only. Similarly like Post-Build event, you can use Pre-Build event to remove some assemblies from GAC.
That’s all.
Hope this will help !
Cheers !
Aj.
http://twitter.com/#!/AbhijitJana/status/106461017319555073


good explanation … 🙂
LikeLike
nice post.
LikeLike
Let’s assume, the Assembly is targeted to .NET 4.0 . To Add this Assembly, we have to specify the below Pre-Build Command.
This should be Post-Build Command.
LikeLiked by 1 person
Thanks mate !! Corrected !
LikeLike
FYI if you do this with several assemblies in your solution you might need to disable codelens in visual Studio, as this way of adding assemblies to the gac at build time is not recommended.
https://connect.microsoft.com/VisualStudio/feedback/details/1656612/microsoft-alm-shared-remoting-remotecontainer-locks-dependent-project-output-files-solution-fails-recompilation
LikeLike