This is the fourth post in the series of Holographic App Development Using Microsoft HoloLens. In the past few posts you have seen how to getting started with HoloLens app development by setting up your dev. environment and developing a Universal Windows App for HoloLens. While Universal Apps that we have learned was 2D, it is now time to take it forward toward next step. In this post I am going to discuss how to build your first 3D application for HoloLens using Visual Studio 2015 and Unity 3D.
Must Read
While all the prerequisite mentioned in the first post (Start Building Holographic Apps with Microsoft HoloLens) , do ensure you have following tools installed before you start with the development with Unity 3D .
In this post we will learn how to create your first unity project, using a building blocks applications. We will take this solution forward for next steps to learn more in further posts.
Building Blocks – Part I
Creating The Unity 3D Project
Start a new instance of Unity and provide the Name and Location of the project. Consider the name as “BuildingBlocks” and also make sure you are selecting the 3D option.

One unnoticeable thing, just quickly scan the title bar. It is good for your to early identify which version you are using incase you have multiple version installed . For Unity Technical Preview for HoloLens will have – HTP ( HoloLens Technical Preview).
The Unity Environment
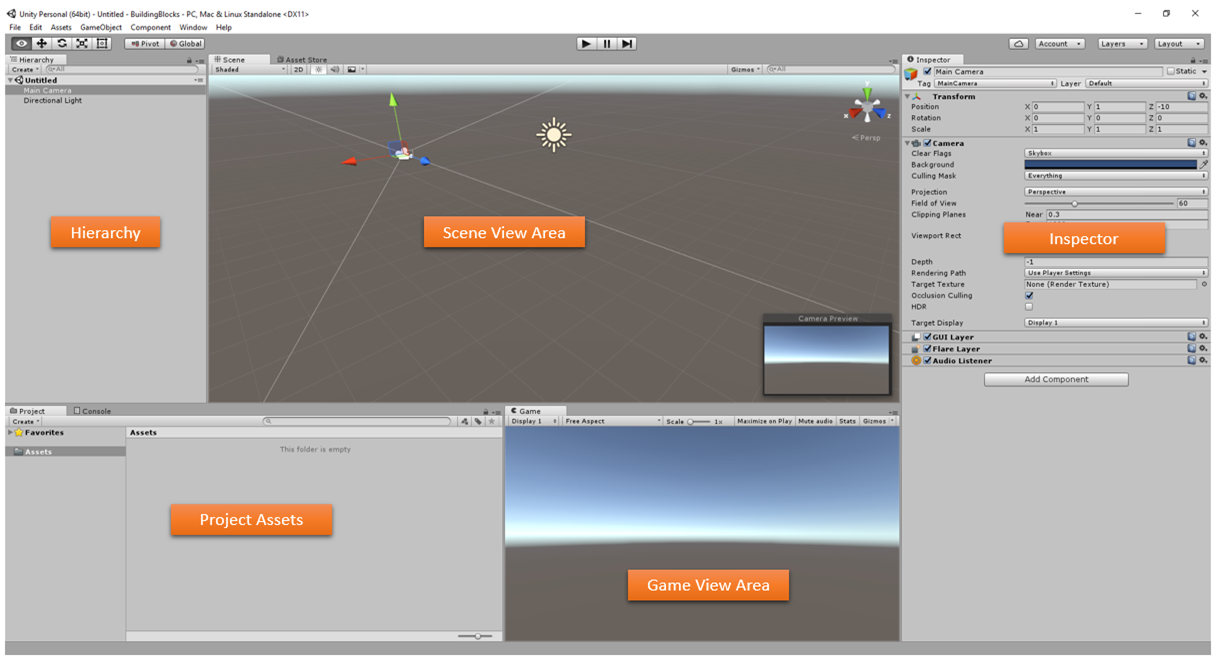
When you first launch Unity 3D, you will have the default IDE layout. It may or may not look like the below, but you will have the following section that we will be focusing on. You can also easily change the layout of your IDE by dragging and dropping them as per your comfort.

Following are the mean areas of the screen we will be working on.
- Hierarchy : List of objects in the scene in a hierarchical order ( Objects, Parent, Child etc.)
- Project Assets : List of all the assets (prefabs, texture, audio, scripts) etc.
- Scene View Area : Area to constructing and manipulating the different objects
- Game View Area : Preview area of game with all the building objects, assets.
- Inspector: Configuring object properties
The objects Controls and Play Controls are the mostly used tool bar control which we will see over the courses.

Setting up the Scene
The Main Camera is the point of view so you need to ensure it is always directional for your view object.
- Select the “Main Camera” in Hierarchy, and in the Inspector view, Set the transformation position to zero (X = 0, Y==0, Z=0 ) .
- Set the clear flag to “Solid Color” and set the background to [ARGB = 0,0,0,0]

Creating the Building Blocks
Adding a Game Object
From the Main menu, Navigate to GameObject –> 3D objects and select “Cube” . You will find the same cube has appear in Game View also in the Hierarchy panel.

Creating and Applying Material
Materials are used in Unity to define how our object will be displayed in the scene . Right Click on the Project Asset area, select Create –> Material to add a new material.

Once a new Material added, rename it to “RedMaterial” and apply Red Color into it. Apply some Metallic and Smoothness effects for better visualization and display.

Once done, Drag and Drop the Material to top of the object either in Scene or in Hierarchy. The Material will be applied to the Cube Object.

Applying Multiple Blocks
Follow the previous steps and add multiple cube objects ( You can just copy past them ) and create different color shaded materials and randomly apply it to those cube.
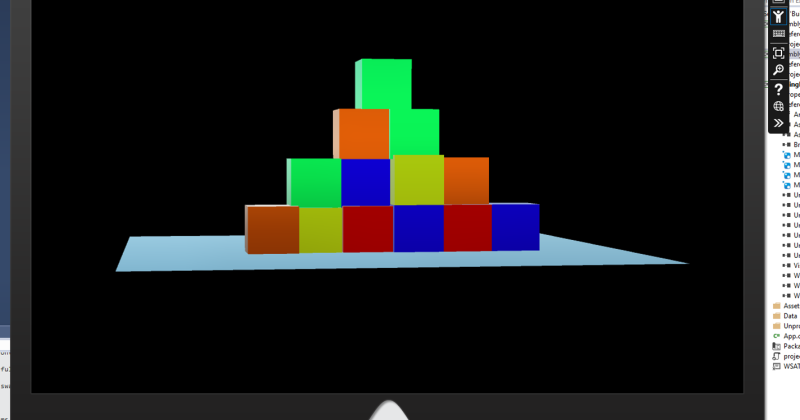
As shown in the following images, we have 5 different set of colors material created which has been applied to set of cubes.

From the GameObject menu, Add a new Plane Object and organize those cube in a stack top of the plane.

Press the Play button and just have a look if everything looks fine or not !
Finally, Save the Scene and name it as Blocks and you should see it appearing in the asset folder.

Making your App ready for Visual Studio and HoloLens
Building the Unity Components
From the main menu, navigate to File –> Build Settings and perform the following.
- Choose the Platform as – Windows Store
- Click on “Add Open Scenes”’ and Select “Blocks” Scene
- Choose SDK to “’Universal 10”
- Choose UWP Build Type to D3D
- Select Unity C# Project Check box on.

Select on the Player Settings button and from the right side inspector section, select “Virtual Reality Supported” from Other Settings.

Once done, Click on Build button and select a folder ( Create it for first time) where you want to keep your app code.

Once Selection done, Unity will start building the solution automatically and will create necessary player and Visual Studio Solution.

Once Unity done with his job, you will have the code folder open in front of you with all necessary files

Open the Solution in Visual Studio
Open the BuildBlocks.sln file in Visual Studio 2015 and following is the first looks of your solution structure with all the projects and unity assets and artifact. We will look into the details of these project in later posts.

To run the application choose following option
- Mode – Release
- Platform – x86
- HoloLens Emulator

Run the Application !! Wait for a while to start the emulator !! And You are done !!
Your first 3D application is running on HoloLens emulator !!

Using cursor to move around, and [A, D, S, W] button for left, right, forward and backward movement.
That’s it for now. In the next post we will take this App forward to next steps !
Hope you enjoyed it !


Thanks Men! simple and to the point.
LikeLike
Interesting article. Very well explained and extremely helpful for beginners.
LikeLike
Thanks. Glad that it helped you !
LikeLike
i use unity 5.5.2 and its not working. anything special i need to do?
LikeLike
What is not working ? If you can explain me that, I would try to help.
LikeLike
Hi,
I would like to use the “Perception simulator manager” provided by Microsoft, to simulate gestures on my holographic app.
What I would like to achieve:
> I have a holographic app developed from unity, and build as D3D(usable in Visual studio)
> I would like to create a test project in Visual studio-> install the app onto the emulator
> Launch the app in emulator (through code), then be able to perform various tests (for ex: login validation) etc
> Perform perception simulation
Can you pl guide me on how to achieve this?
Thanks!
LikeLike